

How To Remove All Animations From Keynote
Presentation animation is a groovy manner to add professional polish to your Google Slides presentation. Yous can utilise animations and transitions between slides to help your presentation flow seamlessly. Y'all tin fifty-fifty define how long transitions should last.
In this tutorial, we'll teach you how to apply Google Slides animations and transitions. We'll start by explaining what animations and transitions are. Then nosotros'll provide a step-by-stride guide to creating your ain animations and transitions.
Guide to Making Neat Presentations (Free eBook Download)
Before continuing on, exist sure to kickoff grab the perfect compliment to this tutorial. Download our new, free eBook: The Consummate Guide to Making Great Presentations. It will help you master the consummate presentation procedure.


At present, let's get started with a quick video tutorial that covers the basics of how to brand Google Slides animations and transitions.
How to Quickly Use Google Slides Animations and Transitions (Screencast)
For a quick look at how to utilize Google Slides animations and timed transitions, watch the screencast below.
For more than detailed information about making animations and transitions in Google Slides presentations, review the written steps in this tutorial that follows:
What Are Animations and Transitions?
Earlier you lot learn how to use animations and transitions in your Google Slides presentation, it's important to understand what each term means.
1. Multiple Animation Options in Google Slides
Animations are used within a slide to add involvement. If yous've always seen text paint onto a slide line by line in a presentation, you've witnessed an animation effect. And that is just i of several animation furnishings in Google Slides.
two. Use Presentation Transitions Consistently
Transitions are a specific type of animation that you lot can use between your slides. For example, you could have each slide fade in from black.
In Google Slides, you define the transitions betwixt your slides at each slide, although to you lot can apply your selection to all the slides in your presentation at once. It'southward best to remain adequately consistent with the type of transition y'all use between all the slides in your presentation rather than using a different transition type for each slide.
3. Recollect: Don't Overdo It
Transitions and animations are a slap-up way to add involvement to your Google Slide presentation and retain your audience'south attention. Merely, be conscientious. You don't want to overdo it. Too many animations can make your presentation seem busy and will distract from your bulletin.
How to Add a Transition to a Google Slides Presentation
This section provides step-by-step instructions on how to add an blitheness to a Google Slides presentation. Earlier you lot get started, cull a Google Slides presentation that you want to add animation to.
For this tutorial, I'm going to apply an email presentation that I created in Google Slides:
.jpg)
.jpg)
.jpg)
Notation: AnyTown Consulting is a fictitious entity used solely for instructional purposes. It is not meant to represent a real organisation.
The sample presentation in this tutorial is made using the Fob Google Slides Template (no longer available).
Notice more swell Google Slides presentation templates from GraphicRiver. You tin can browse through this curated selection of the best to find the perfect blueprint for your next presentation:
Allow's become started with leaning how to piece of work with Google Slides transitions.
Pace i. Open the Animations Panel
Showtime with the Google Slides presentation open up to the slide where you lot want to add together a transition. Click the Transition button to the right of the toolbar.
.jpg)
.jpg)
.jpg)
The Animations console displays on the right of the screen:
.jpg)
.jpg)
.jpg)
As you can come across from the top of the Animations console, the slide currently has no transition defined. Our next step is to add a transition.
Stride 2. Add a Transition to a Slide
With the Animations console open, click the down arrow to the right of the words No Transition. You'll see a drib-down menu list the available transition furnishings:
.jpg)
.jpg)
.jpg)
Yous have seven transition options:
- No transition. There is no transition. This tin can as well be selected to plow off an existing transition.
- Fade. The contents of the slide slowly appear the screen.
- Slide from right. The contents move onto the screen from the right to the left.
- Slide from left. The contents move onto the screen from the left to the right.
- Flip. The slide flips over as it paints on to the screen. The effect is almost equally though a paper has been turned over.
- Cube.A rectangular three dimensional shape gradually flips over to display the slide.
- Gallery. The contents movement to the left to display the adjacent slide.
To select a transition, click on it. Yous'll notice that the transition type you selected replaces the words No Transition in the Animations panel:
.jpg)
.jpg)
.jpg)
You lot'll find that I selected the Flip transition type for this tutorial.
Step 3. Define the Transition Timing
After you've divers the transition type, you tin make up one's mind how quickly it occurs. Beneath the transition type selection is the Transition Timing slider. (It is near clear, and then you may not run across the slider until yous click on it to move it.) Here's what information technology looks like when y'all click on it:
.jpg)
.jpg)
.jpg)
Notice that the sliding scale is labeled: Slow, Medium, and Fast. To speed upward the timing of your transition, drag the slider to the right. To slow the slide transition timing down, drag the slider to the left. Hither's a slider beingness dragged to Medium position:
.jpg)
.jpg)
.jpg)
The length of time the transition will last in displays in a higher place the slider as you drag it. In this case, the transition will last for 2.8 seconds. The timing on the slider ranges from v.0 seconds to 0.0 seconds.
Knowing how long your transition will final can aid as yous plan the timing of your Google Slides presentation. Information technology can be particularly important for longer presentations with irksome transitions.
Step 3. Apply Your Transition to All Slides
If you wanted to, you could define a different transition for every slide in your presentation. However, that could be distracting and make your presentation look sloppy.
Fortunately, at that place'due south an easy way to apply the same transition to all the slides in your presentation. This is a large time saver besides. Merely click the Employ to all slides button below the Transition Timing slider:
.jpg)
.jpg)
.jpg)
The transition y'all defined is practical to all the slides in your presentation.
Step four. Exam Your Transition
At present that you've defined a transition type for your presentation, you should examination it. Testing your transition outcome is a good way to tell how it volition affect your Google Slides presentation.
In that location are 2 ways to test your transition:
Method 1. From Within the Animations Console
Exam the defined animation by clicking the Play button on the Animations panel:
.jpg)
.jpg)
.jpg)
The transition issue for the selected slide displays in the center of the screen.
Method 2. Using the Present Push
When you lot take defined the transition, close the Animations panel by clicking the Ten in the upper right corner.
With the Animations panel closed, click the Present push next to the bill of fare:
.jpg)
.jpg)
.jpg)
A full-screen version of your presentation displays. Use the pointer in the bottom left to motility betwixt the slides:
.jpg)
.jpg)
.jpg)
Press <Enter> on your keyboard to move between the slides. Each fourth dimension the presentation moves between slides, it uses the transition yous defined.
After you lot've finished testing your transition result, you lot may want to adapt it by changing the time or even selecting a different transition result altogether.
Step 5. Remove or Change a Transition
It'due south not difficult to remove or change a transition after it has been defined. Start with the Google Slides presentation open to the slide where you want to remove or modify the transition. Click the Transition button to the correct of the toolbar. The Animations panel opens:
Use the drop-down card to select a new transition. Or, select No Transition to turn transitions off for the selected slide.
Apply the Transition Timing slider to redefine how quickly the transition displays. When you lot are finished, apply the transition changes to all the slides by clicking the Apply to all slides button.
How to Add together an Blitheness to a Google Slides Presentation
This section provides step-past-step instructions on how to add slide animations to a Google Slides presentation:
Stride 1. Choose a Slide
Open up the presentation you wish to work with. For this tutorial, I volition continue using the Email presentation based on the Fox Google Slides Template (no longer avaliable.
To select a slide, click on a thumbnail on the left. The selected slide displays:
.jpg)
.jpg)
.jpg)
I choose the 3rd slide because I desire to animate the text nether each heading. The adjacent step is to open the Animations panel.
Step ii. Open the Animations Panel
Google Slides animation effects use the same panel equally Google Slides transitions.
To open the Animations panel, click the Transition button to the right of the toolbar:
The Animations panel displays on the right of the screen:
Notation: You can also open up the Animations console with the Insert > Animation bill of fare choice.
Equally you can see from the centre of the Animations console, no animations are ready for this slide. Our next step is to add animations.
Footstep 3. Ascertain Animations
To define animations, you lot demand to first select the objects to exist animated. Click on the object you wish to breathing starting time. In this instance, a text box:
.jpg)
.jpg)
.jpg)
Next, click the plus (+) symbol next to the words Add blitheness to display the Google Slides animation options:
.jpg)
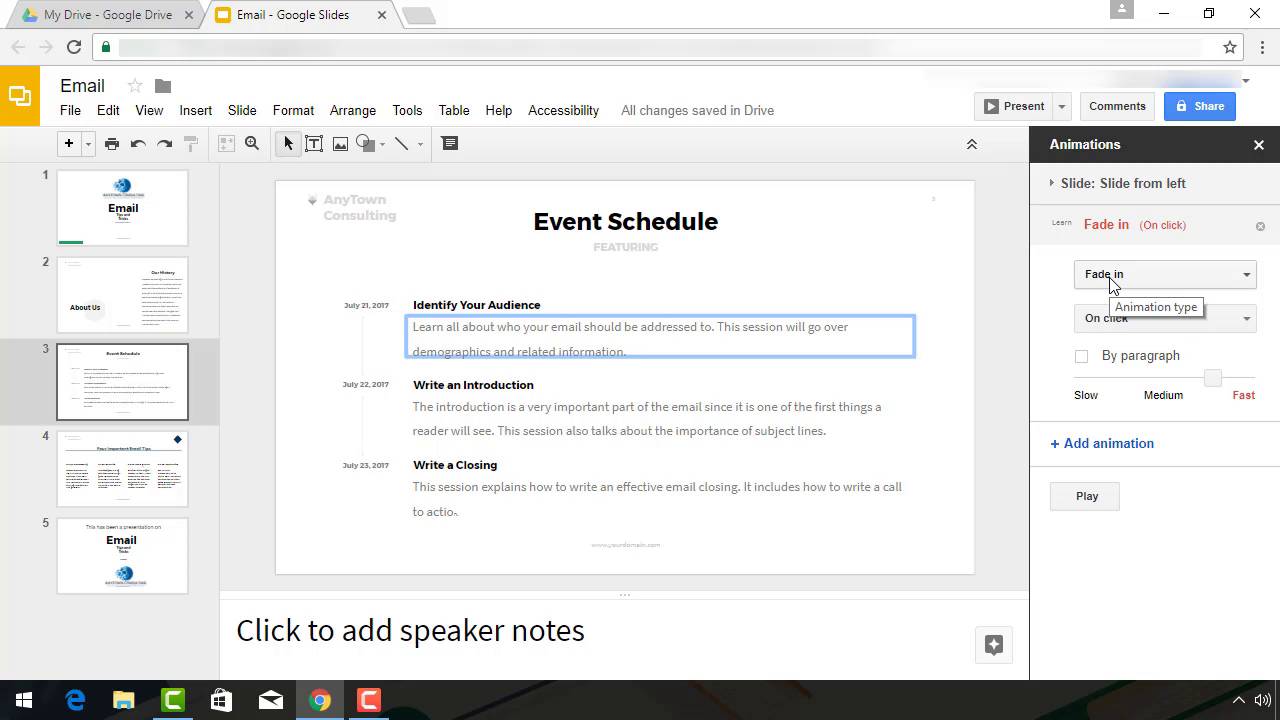
You'll notice that the default animation is set to Fade in (On Click). To change the default, starting time click the downwards pointer to the right of the words Fade in. A drib-down carte appears:
.jpg)
.jpg)
.jpg)
Every bit y'all can see, there are many different animation effects to choose from.
Most of the animation furnishings descriptions are self-explanatory. However, pay attending to the words "in" and "out" in the animation event description:
- Blitheness effects with the give-and-take "in" in the description add the selected object to your slide.
- Animation effects with the word "out" in the description remove the selected object from your slide.
- Likewise, the animation event Announced adds an object and the animation outcome Disappear removes the selected object.
Next, yous'll want to define how the animation is triggered. The animation trigger you select determines what activates the animation. To run across the Blitheness Triggers drop-down card in Google Slides, click the downwardly arrow to the correct of the words On Click:
.jpg)
.jpg)
.jpg)
You can define 3 different types of animation triggers:
- On click. The presenter must click to trigger the blitheness. This is the default setting.
- Subsequently previous. The animation plays after the previous animation.
- With previous. The animation occurs at the same time as the previous animation.
Click on an blitheness trigger to select it.
If you click the checkbox next to the Past paragraph field, the animation will exist applied paragraph by paragraph to the selection. This can be peculiarly helpful for animative lists line by line.
Footstep 4. Timing
Now that we've defined when the animation volition occur, it's fourth dimension to define how long each animation lasts. To exercise this, y'all volition use the Animation Timing slider. (It is nearly articulate, so yous may not see the slider until y'all click on it to move information technology.) Here'due south what it looks like when you lot click on it:
.jpg)
.jpg)
.jpg)
Notice that the sliding scale is labeled: Slow, Medium, and Fast. To speed up the timing of your transition, drag the slider to the right. To wearisome the timing downwards, elevate the slider to the left.
Now that you've set up your showtime animation for this slide, you tin add additional animations.
Step 5. Add Additional Animations
To add additional animations to the slide, click on the side by side object you wish to breathing. Click the plus (+) symbol next to the phrase Select an object to animate.
Follow the instructions in Steps 3 and 4 to define the blitheness result. Standing adding animations to the slide as desired.
Note: The club in which the animations are divers will make up one's mind the order in which the animations play if yous select the After previous animation trigger. The commencement animation you ascertain will play first, the second animation y'all define will play 2nd, so on ...
Stride 6. Examination Your Animations
Once you're done defining all the animations for a slide, test them by clicking the Play button on the Animations panel. The animation event for the selected slide displays in the center of the screen.
A second way to test your animations uses the Present button. Close the Animations panel by clicking the X in the upper right corner. Side by side, click the Present push next to the menu. A full-screen version of your presentation displays. Use the arrow in the bottom left to move between the slides. Hither's how the Spin blitheness consequence looks on my sample Google Slides presentation during testing:
.jpg)
.jpg)
.jpg)
Notice the text nether the phrase Identify Your Audience spins earlier moving into place.
Pace 7. Remove or Modify an Animation
Afterwards you've defined an blitheness, you may want to remove it or change information technology. Open your presentation to the slide where you lot want to alter or remove an blitheness. Click the Transition push to the correct of the toolbar. The Animations panel opens:
.jpg)
.jpg)
.jpg)
Click on the animation consequence yous want to change. The details of the blitheness announced in the Animations panel. Hither are the animation details for the Spin animation:
.jpg)
.jpg)
.jpg)
To delete the animation, click the 10 to the right of the animation in Google Slides. Or, click the downwards arrow next to the animation type to redefine information technology. Yous can as well redefine the animation trigger and use the Blitheness Timing slider to redefine how quickly the transition displays.
When you're finished, y'all tin can delete or redefine another blitheness if y'all wish.
Conclusion
If you've been wondering how to add animations and transitions to your Google Slide presentations, you now have the information you need.
Animations and transitions tin help your presentation come across every bit more professional and polished. When applied thoughtfully, animations also add together an actress caste of interest to your presentation and assist to engage your audience.
How to Make Great Presentations (Free eBook Download)
Keep in mind though, animations and transitions can add together polish and pizazz, just groovy presentations need to built on a solid foundation.
Nosotros have the perfect compliment to this tutorial, which will walk you through the consummate presentation process. Learn how to write your presentation, blueprint information technology like a pro, and prepare it to present powerfully.


Download our new eBook: The Complete Guide to Making Great Presentations. Information technology's available for free with a subscription to the Tuts+ Business concern Newsletter.
Source: https://business.tutsplus.com/tutorials/google-slides-animations-and-transitions--cms-29282
Posted by: mcdonoughonink1956.blogspot.com
0 Response to "How To Remove All Animations From Keynote"
Post a Comment